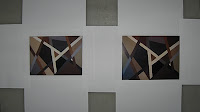
Extra fabric hangs around the edges of this improvisational piece from the Lines Curves Shapes and Figure/Ground workshop. It was cropped for my last post, but as you can see here, it really needs squaring up.
I have no tried and true method to square up pieces bigger than my worktable. This one is about 54w x 42h. Here's how I did it this time.
I have no tried and true method to square up pieces bigger than my worktable. This one is about 54w x 42h. Here's how I did it this time.
I smoothed it out on the design wall, picked a side to start, then chalked a straight line. Using my biggest square ruler, I rotated around and chalked other sides with the hope that the last side would be at right angles to the first one.
To review I pinned fabric strips along each chalk line.
I see I could've started with another edge. Okay, once more around.
To review I pinned fabric strips along each chalk line.
I see I could've started with another edge. Okay, once more around.
 Comparison of the two photos side by side.
 Until I can get to a big table to cut and sandwich it, I securely pinned the strips along the chalk lines.
Next time I'll try squaring it up in Photoshop first. How do you square up?


